-
Phone: 250.427.0510
Original article and pictures take http://www.tyeeloghomes.com/design-and-plans/plans-mountain-modern site
Phone: 250.427.0510
Original article and pictures take http://www.tyeeloghomes.com/design-and-plans/plans-mountain-modern site

Not all Ashley products are in stock in the showroom but we are happy to place a special order for you with quick delivery!
With a unique two-tone treatment of replicated oak grain and metal, this dresser is where modern meets vintage in the coolest possible way. Beautifully weathered treatment of the inlaid plank-style boards has a very, reclaimed, quality, while the metal framework and ultra clean-lined design is urban chic. Six smooth-gliding drawers make for an organized wardrobe.
Product Features
On sale at Red Shed Furniture on US Highway 13 North in Goldsboro. Proudly serving the Goldsboro, Wilson & Greenville, NC areas since 2001.
Original article and pictures take http://redshedfurniture.com/harlinton-warm-gray-charcoal-dresser/ site
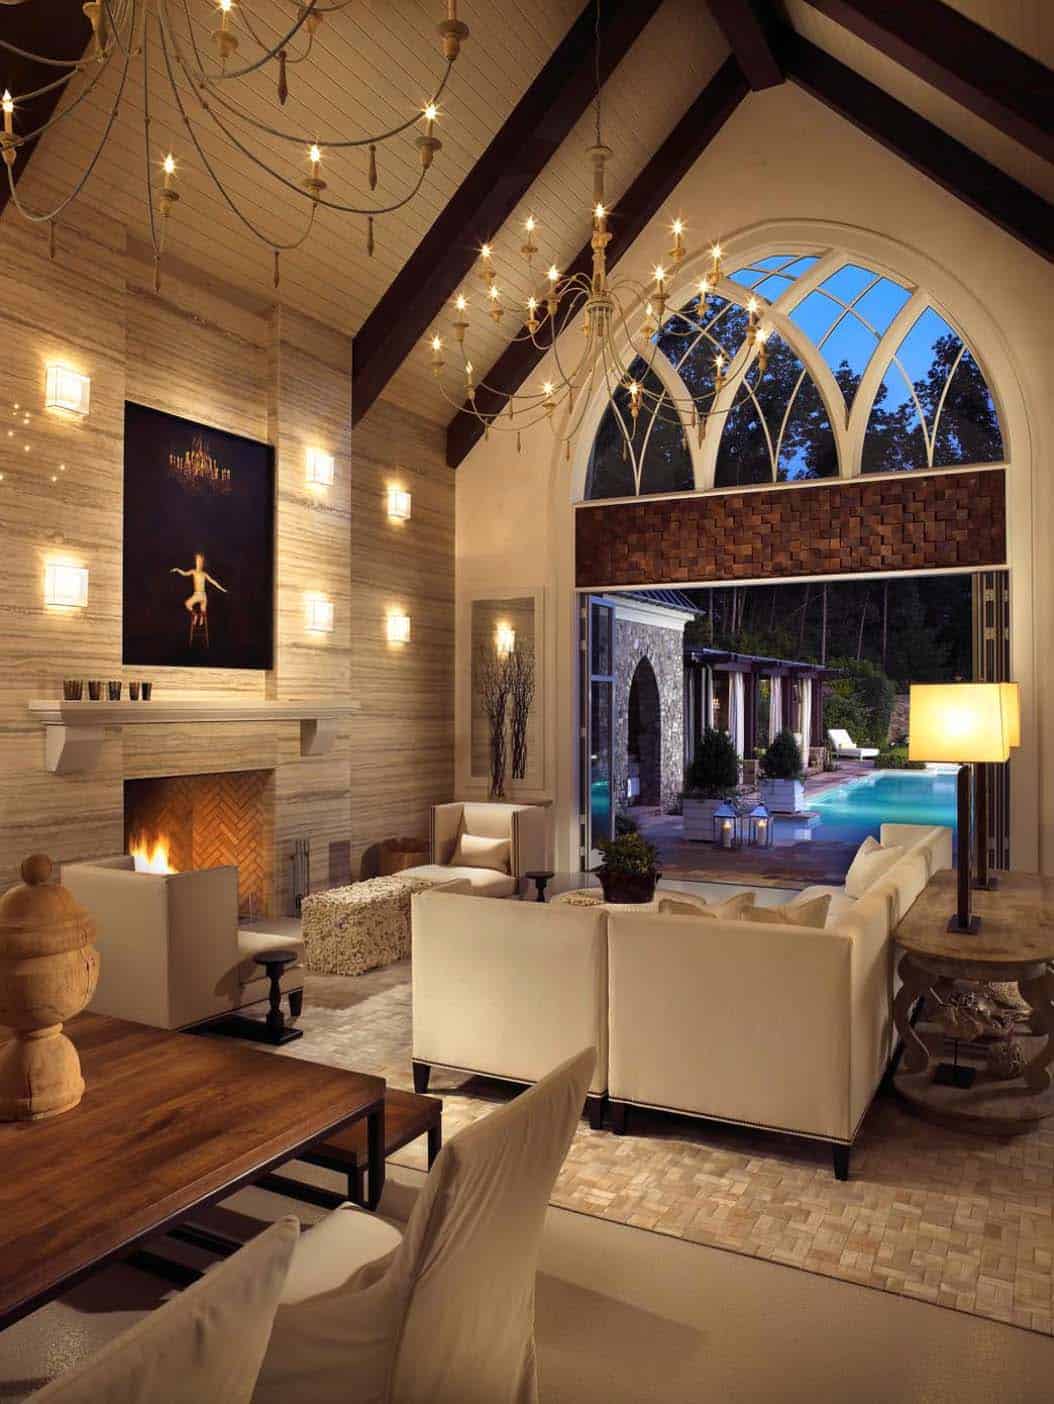
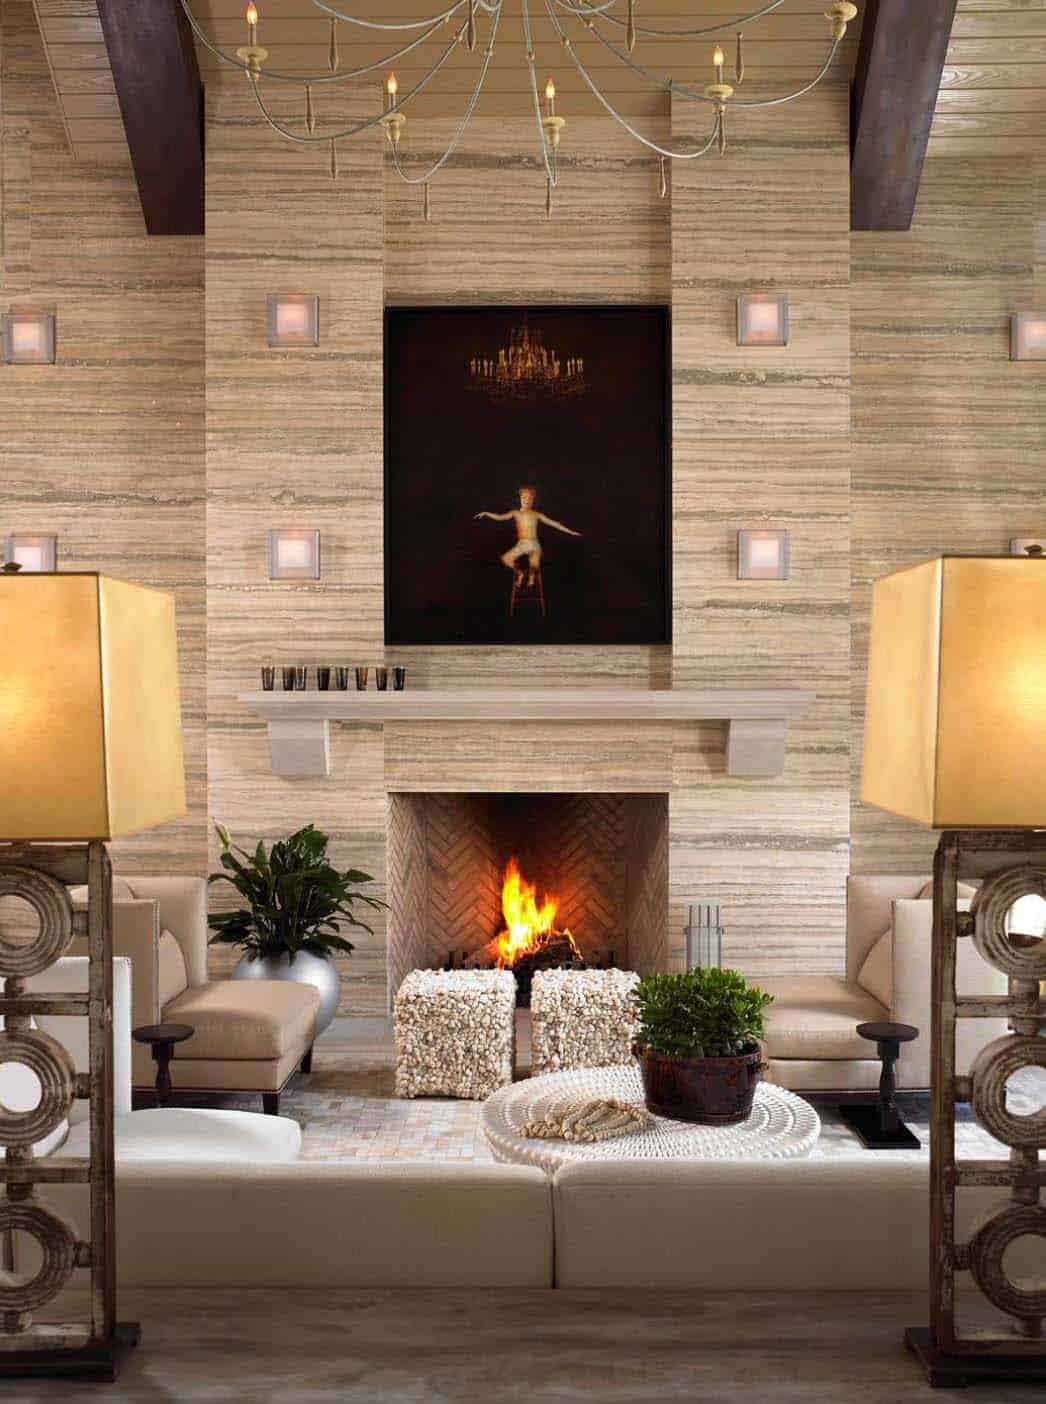
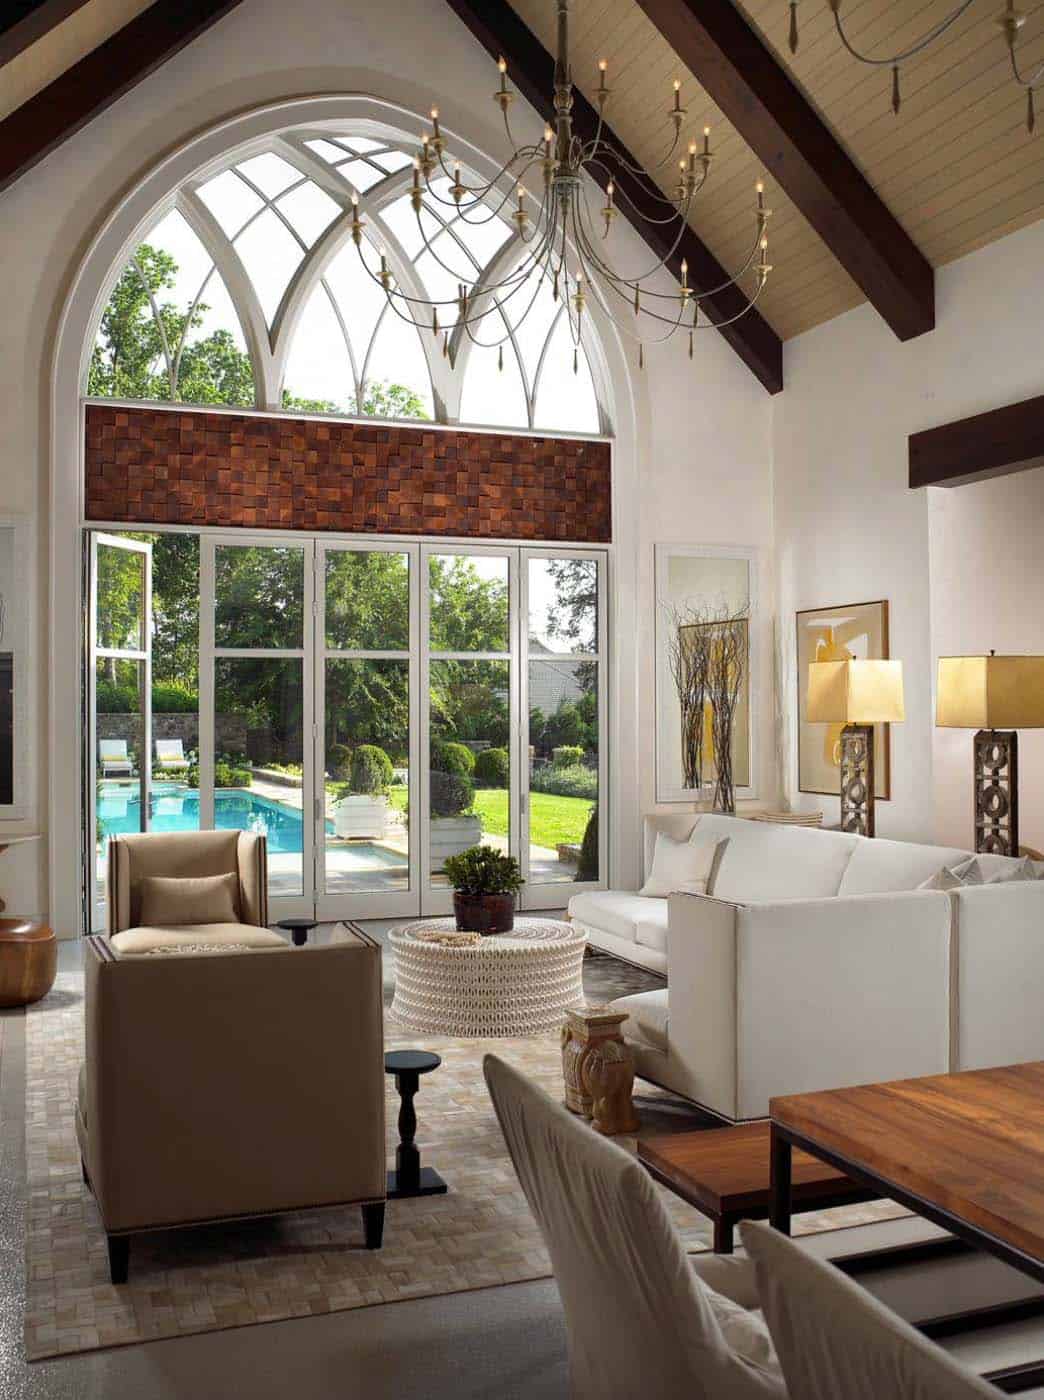
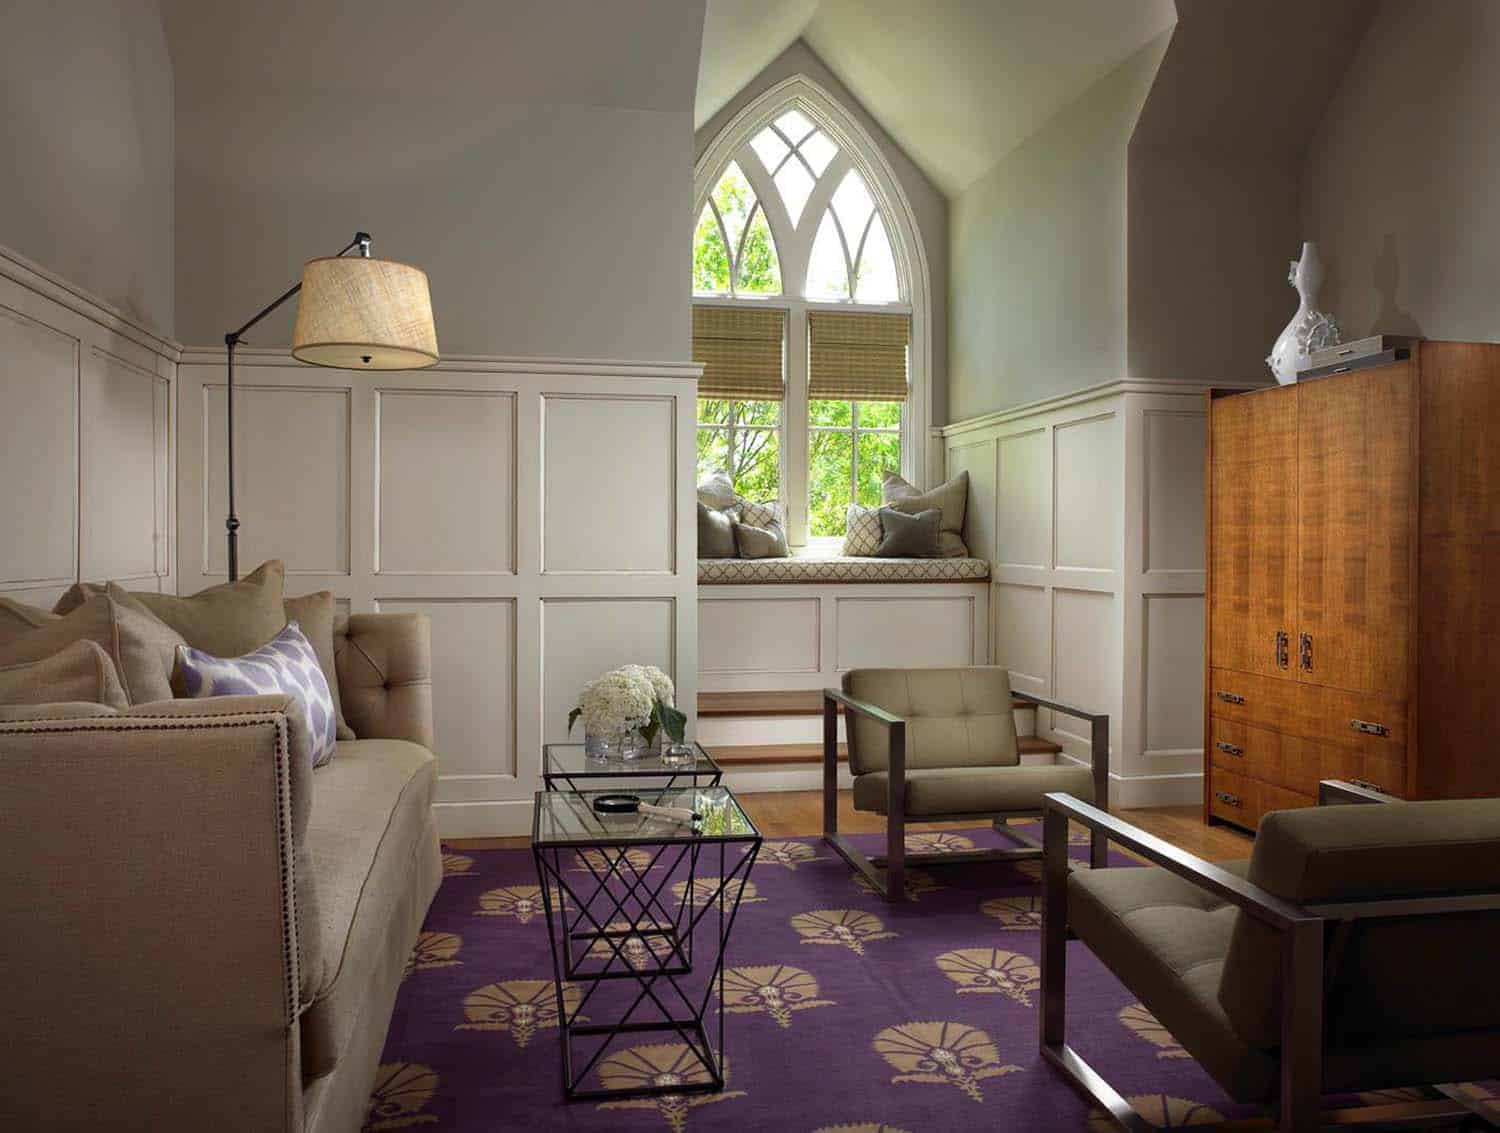
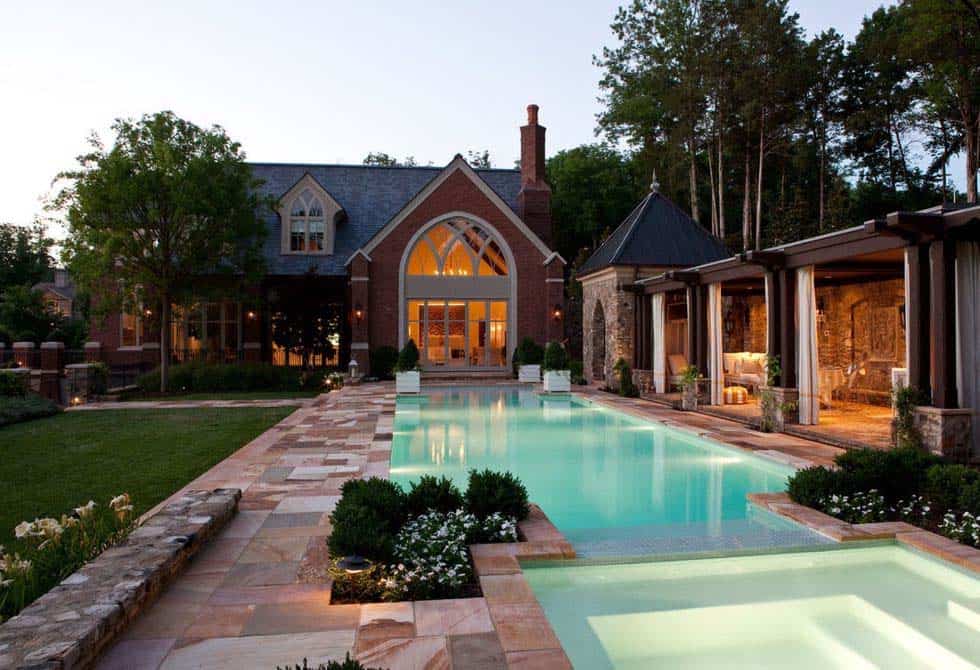
This stunning pool house and wine cellar project was designed by interior design studio Beckwith Interiors, located in Nashville, Tennessee. In addition to being an interior designer and creating her product line, Jamie has a showroom in Nashville where she has curated design products that are unique, beautiful and innovative. The pool house was designed on the grounds of her own house which is a Gothic-style estate, as a place for her out-of-town guests to stay and as an entertaining area for family barbeques and hosting charity events.
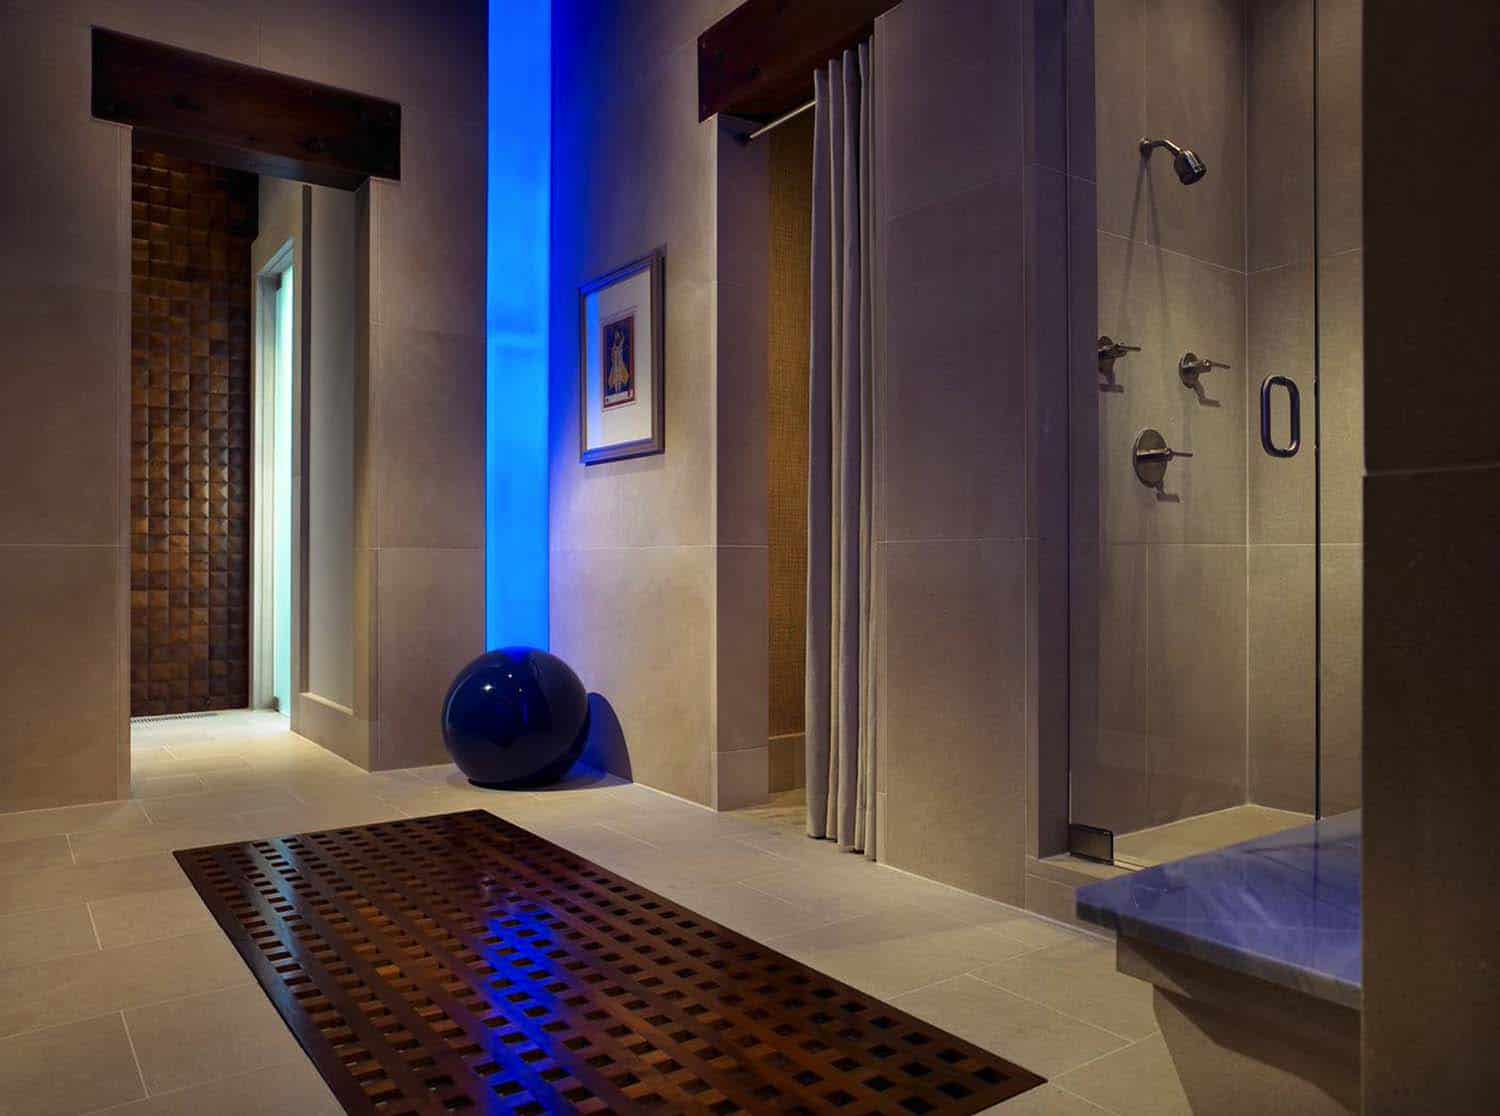
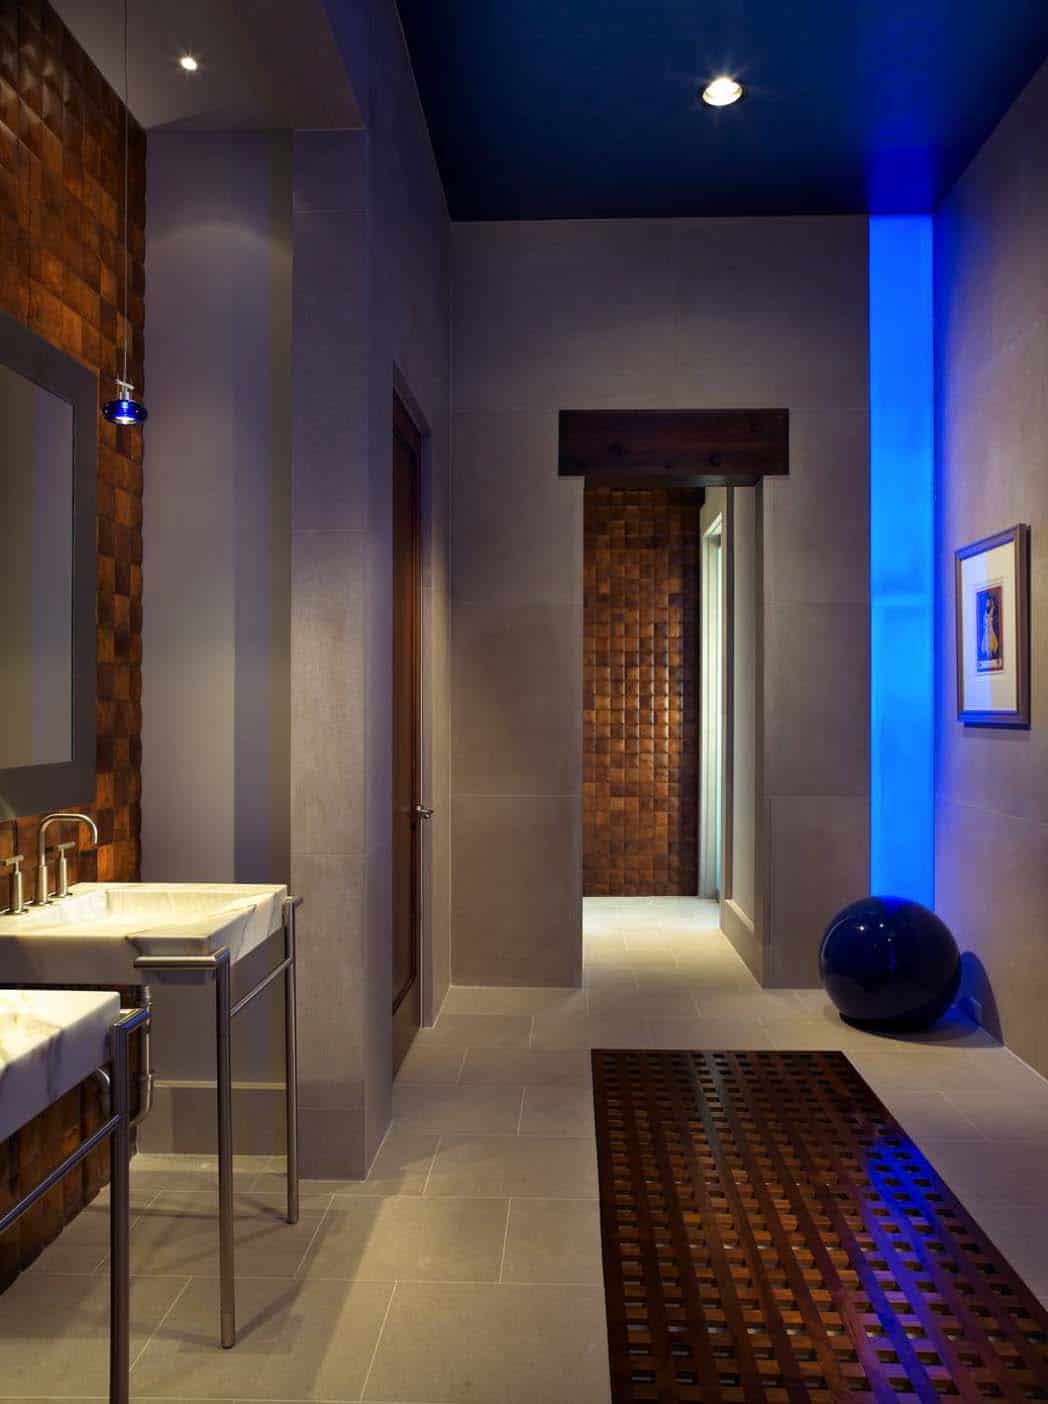
Beckwith used the pool house as an opportunity to experiment with innovative ideas that she had contrived as well as incorporating unique products that she has designed. The house is chock-full of unexpected textures, which includes wood tile flooring, murals, travertine walls and furnishings and rugs that can withstand three young children and guests that are damp from a dip in the pool. The interiors feature Gothic touches which are inspired by the main house, which is a more traditional Gothic style. The pool house has been more modernized with touches of Gothic mixed with cleaner lines.

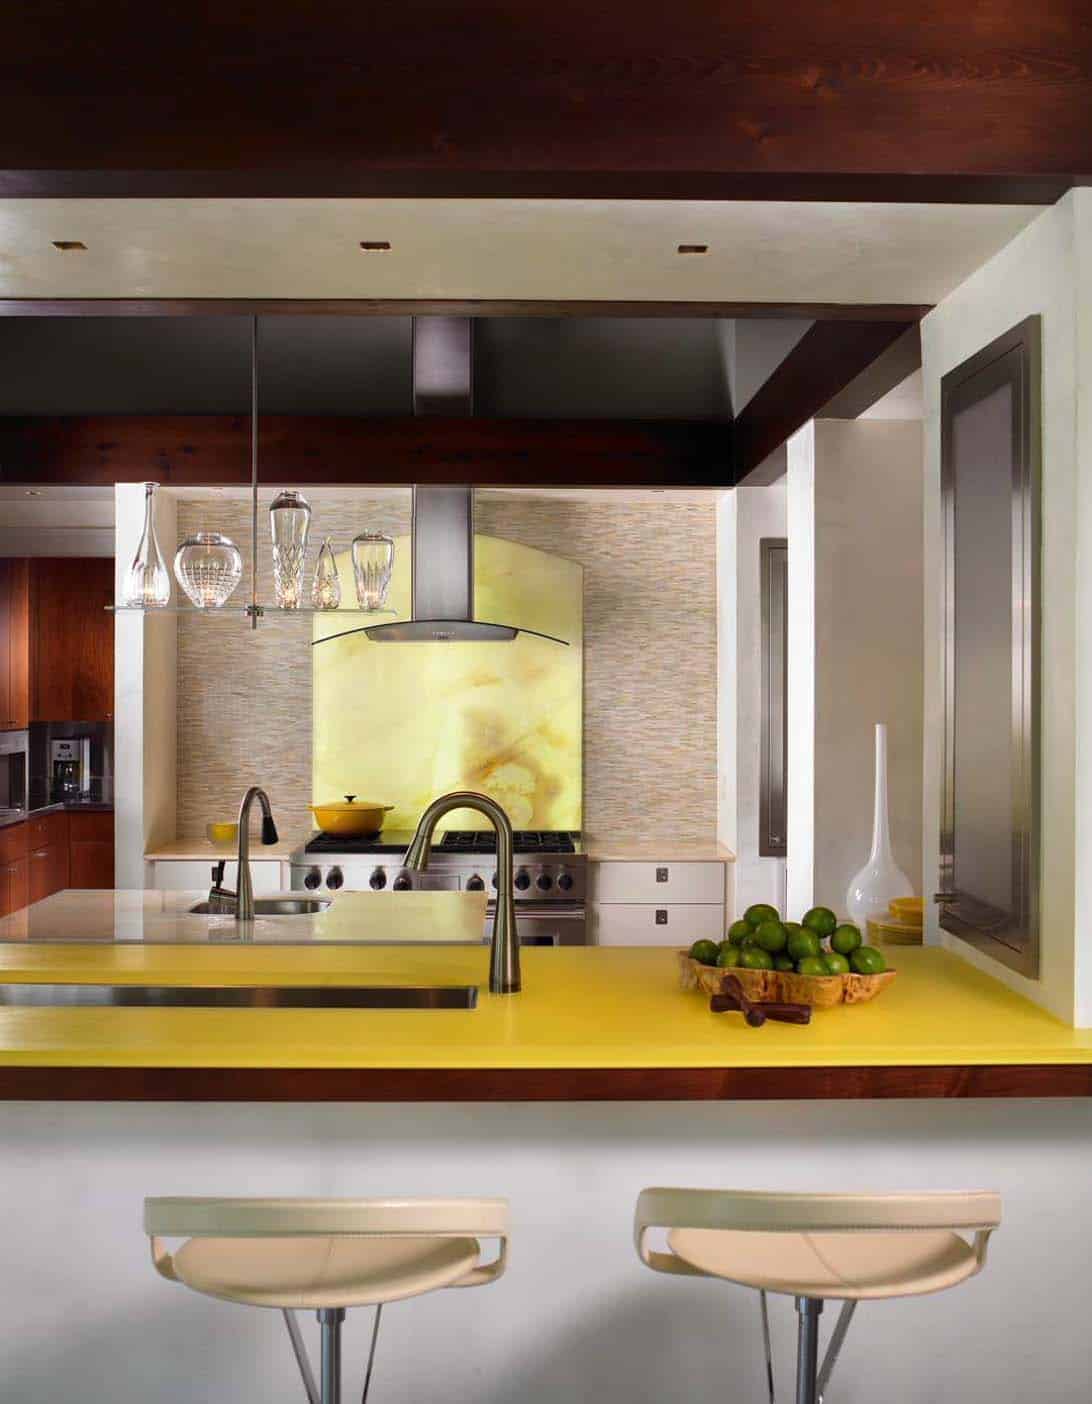
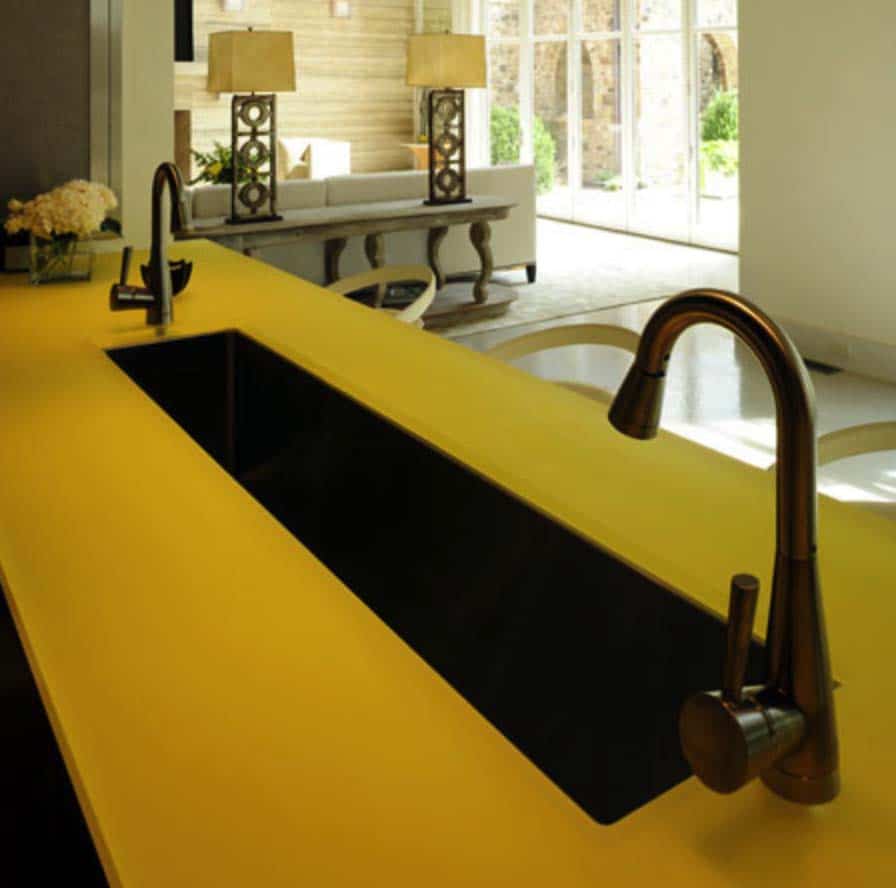
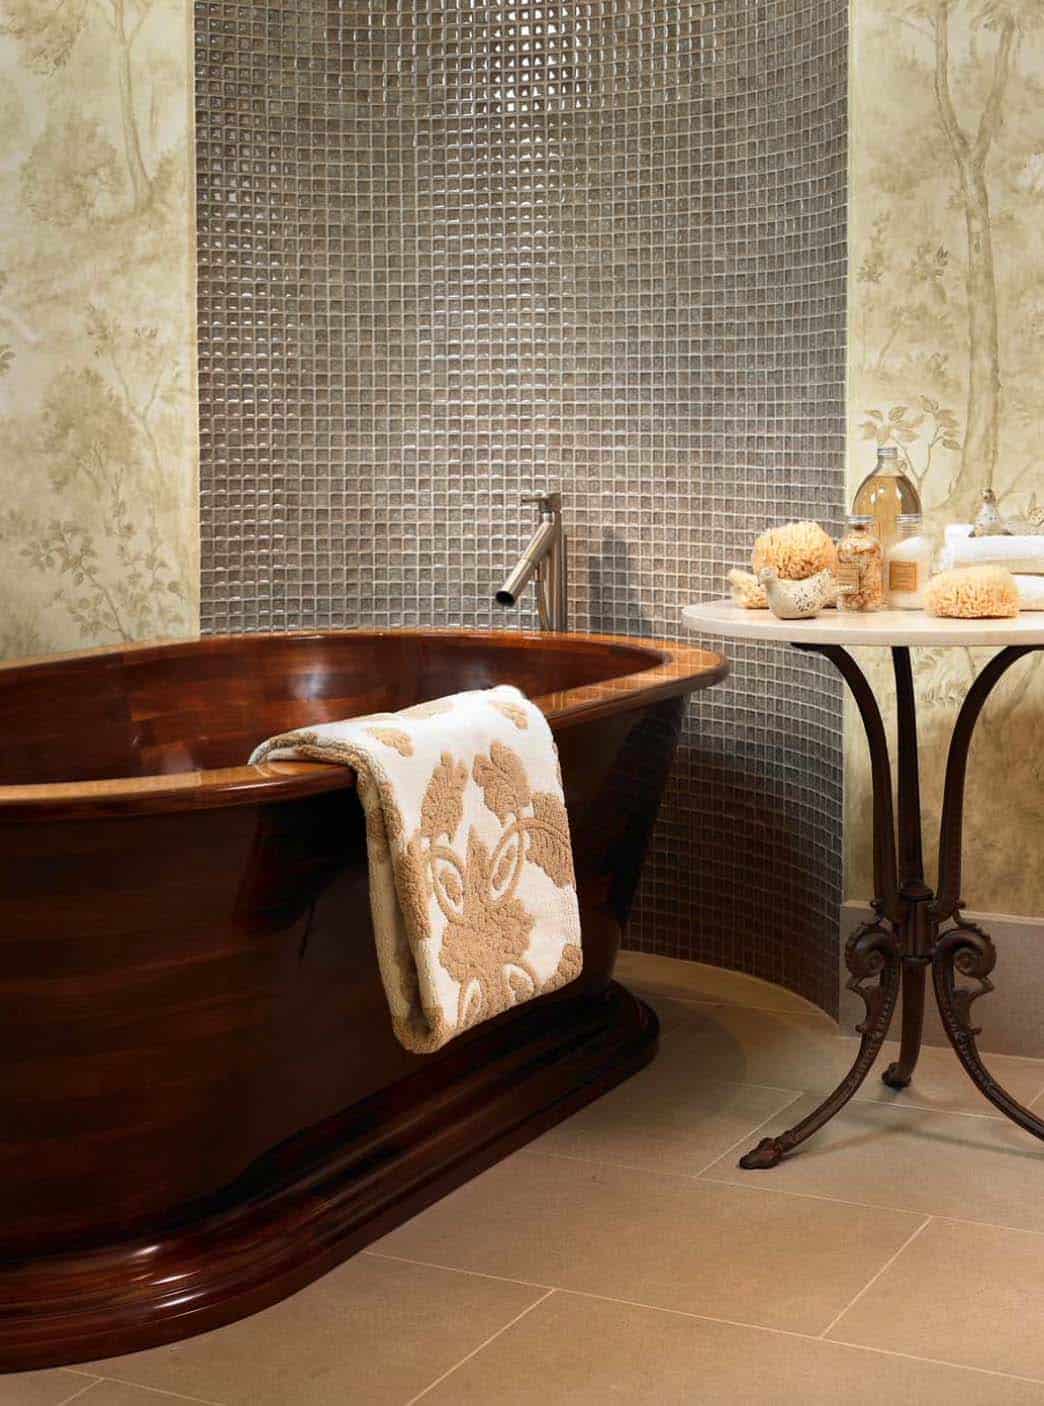
What We Love: This amazing pool house is spread out over three levels, offering everything a guest could need to feel pampered and right at home. Beautifully design spaces offers luxurious touches, including the striking walnut freestanding tub in one of the women’s bathrooms. With separate bathrooms catered to men and women, a steam room can accommodate all guests. This fully equipped pool house offers a spacious kitchen, living / dining room and a formal sitting area with a glass floor overlooking a fabulous wine cellar!
Readers, please share with us in the Comments what you think of this incredible pool house and wine cellar. We here at One Kindesign would love to read your feedback!
Above: Most of the fabrics used throughout the pool house are indoor/outdoor, so guests keep their wet bathing suits on when they sit on the furnishings. The flooring is an epoxy, impervious to scratches and staining.
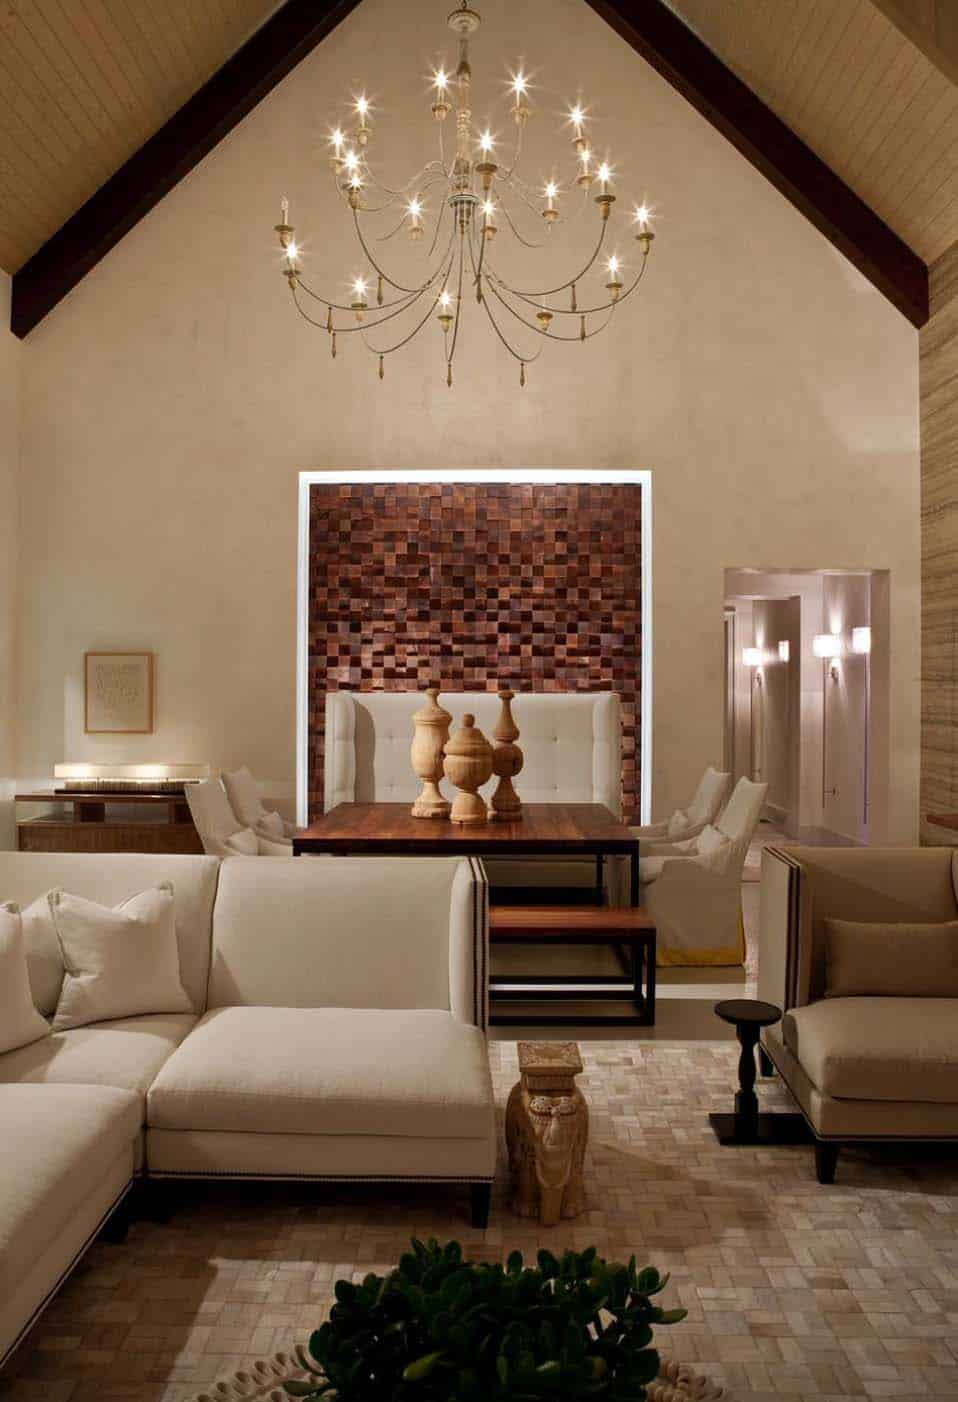
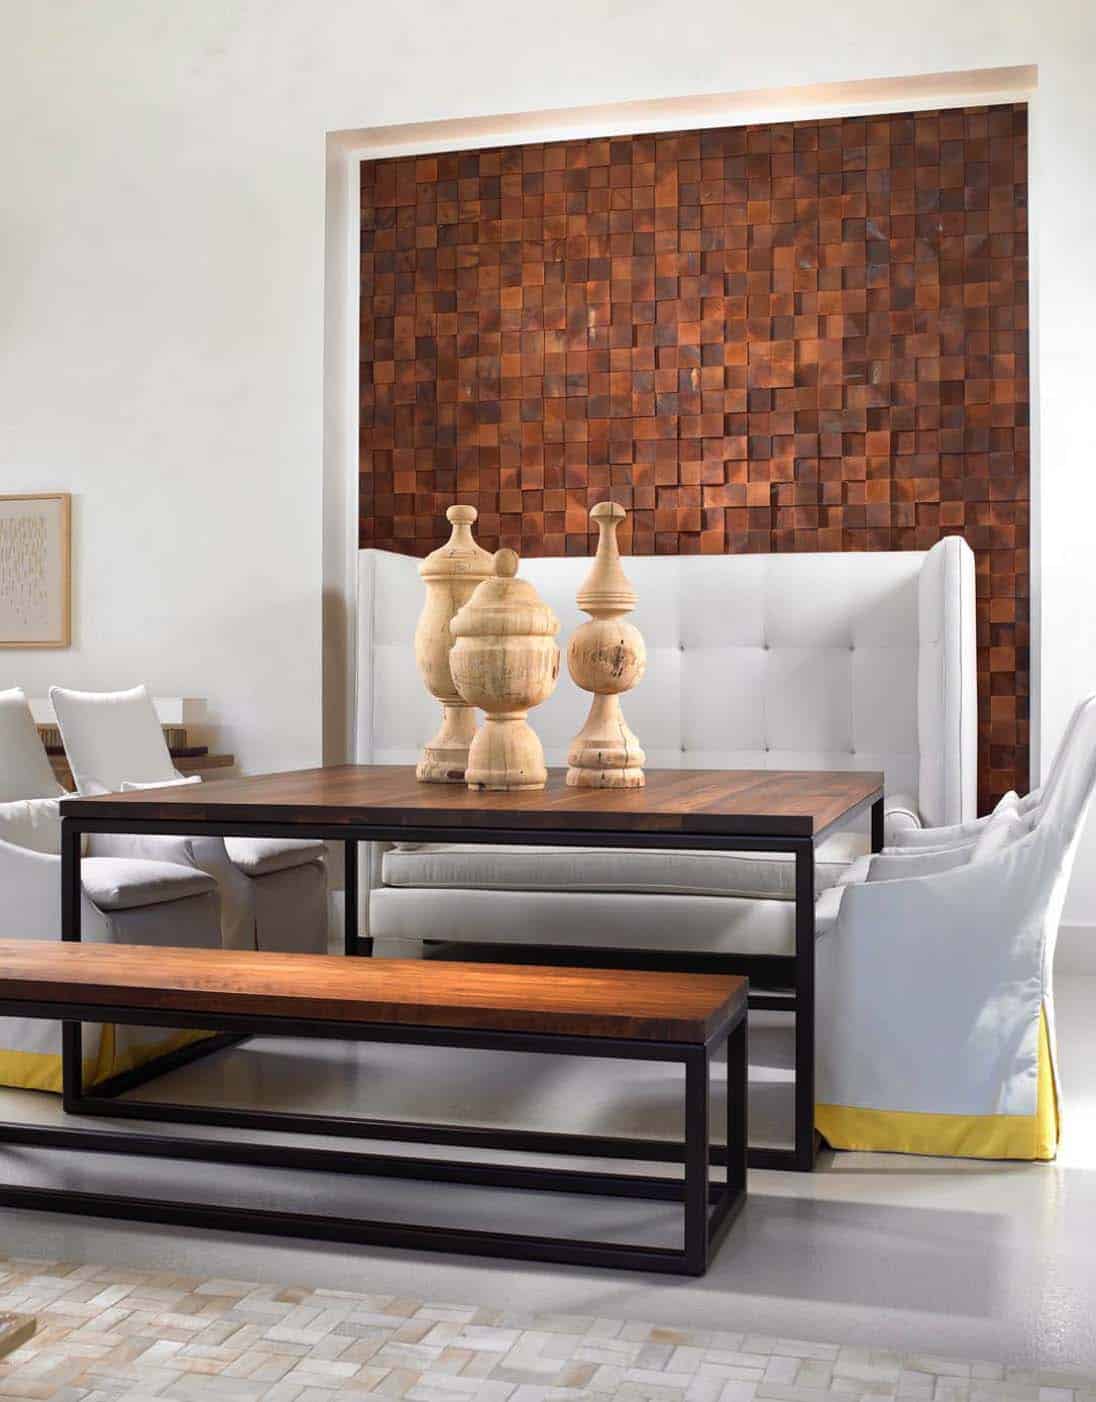
Above: This mosaic wall is made from western red cedar called “Projection,” it’s another product that Jamie created for her collection.
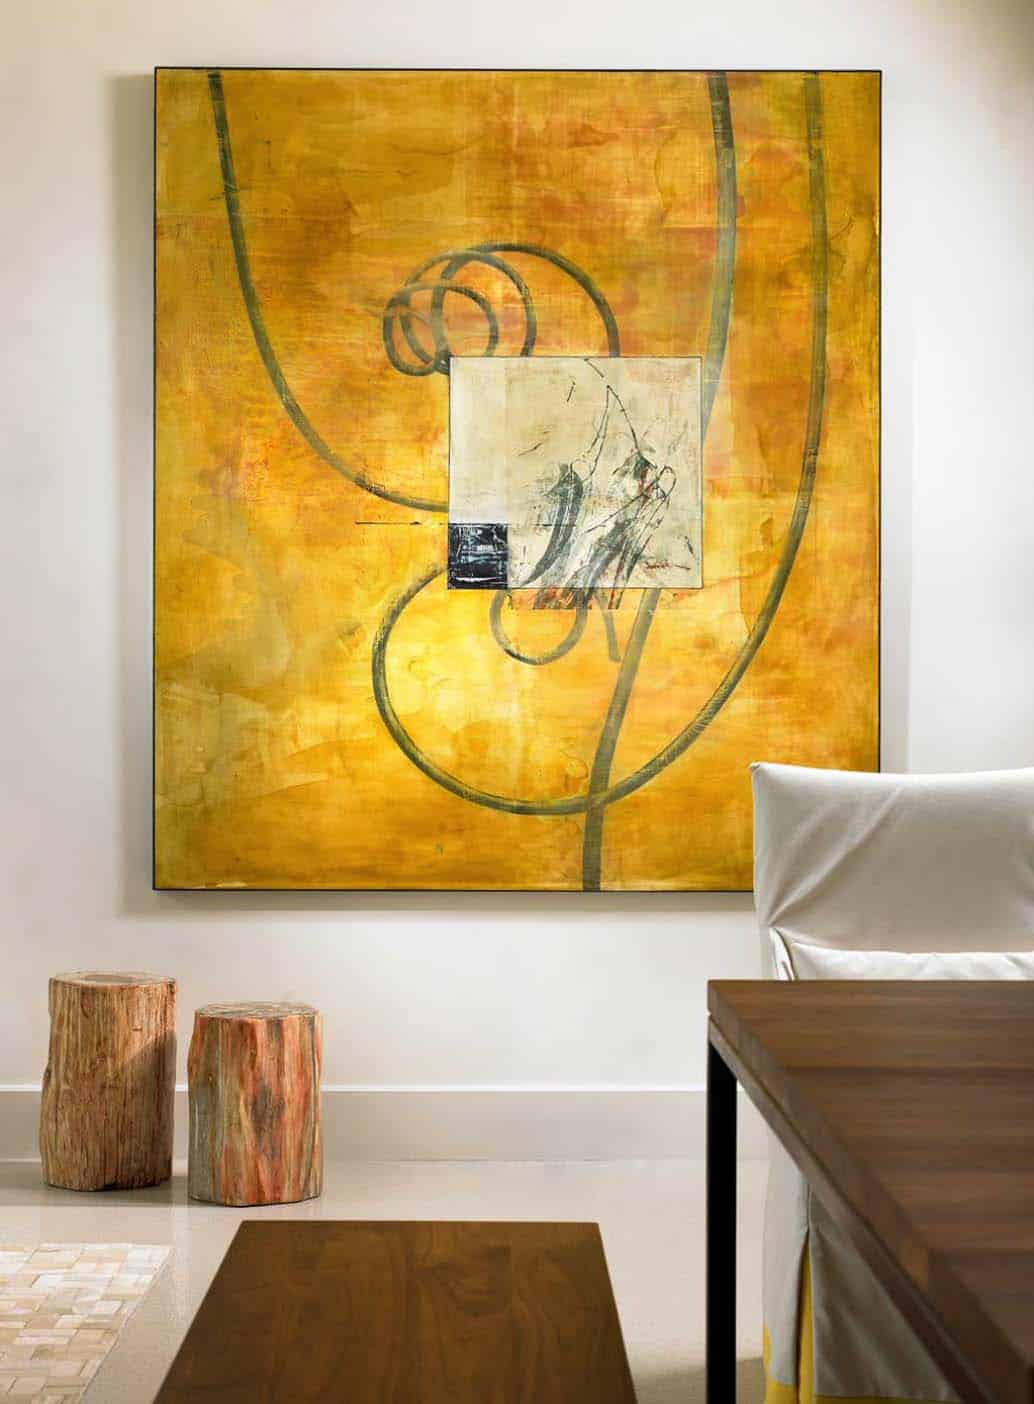
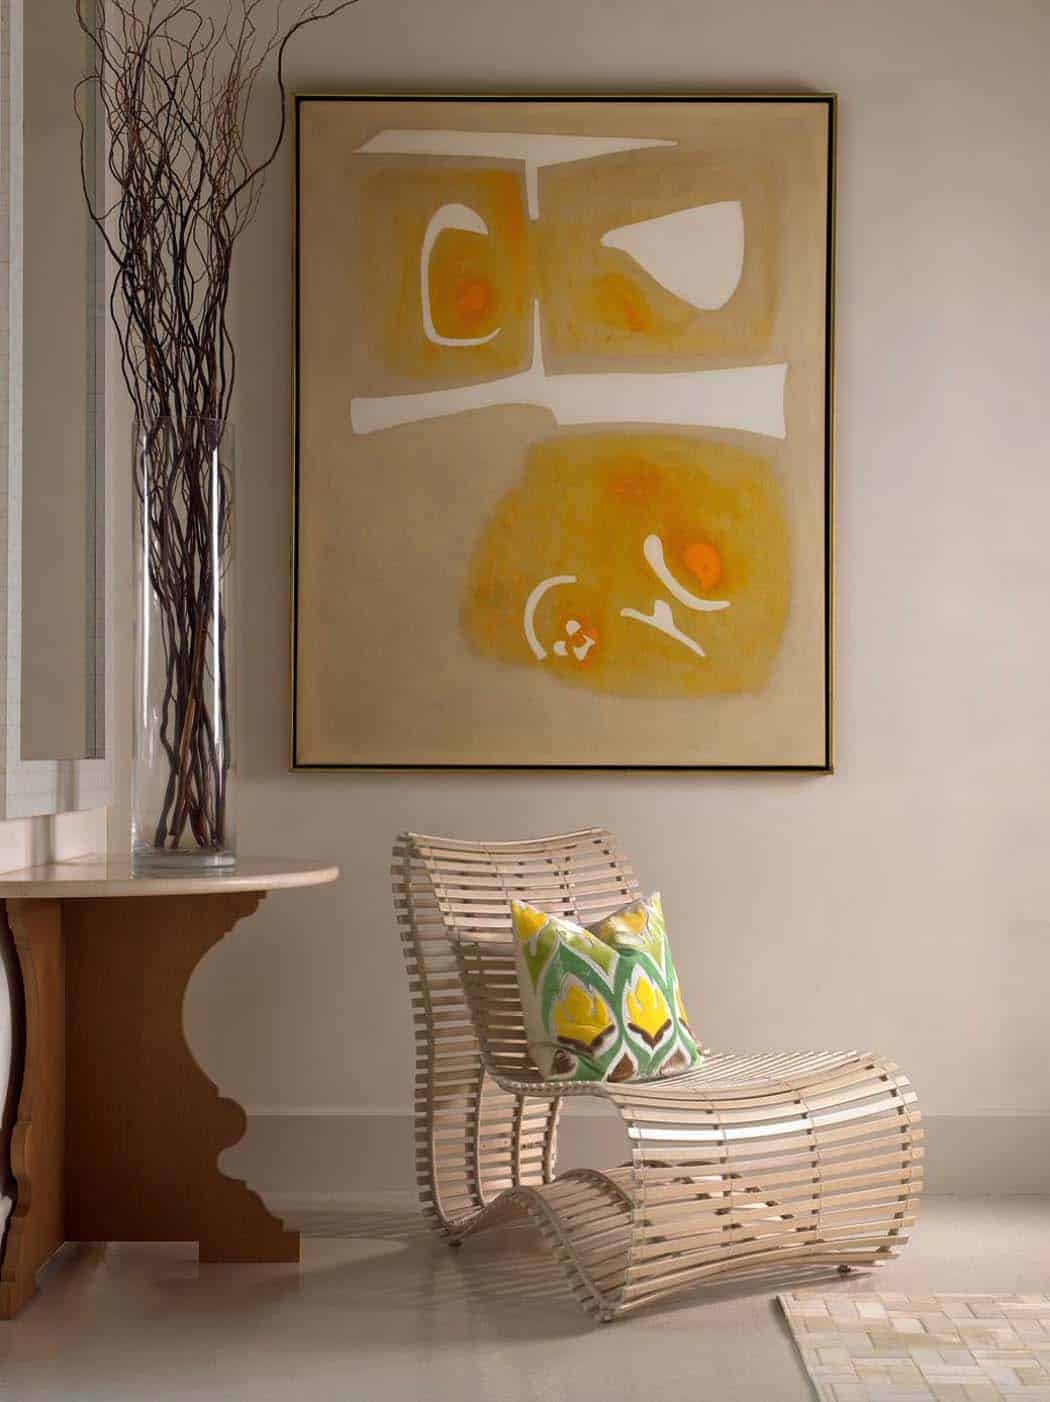
Above: Large-scale artwork was selected for their graphic nature and to add bold punches of yellow throughout as well as to match the proportions of the large walls and open floor plan.
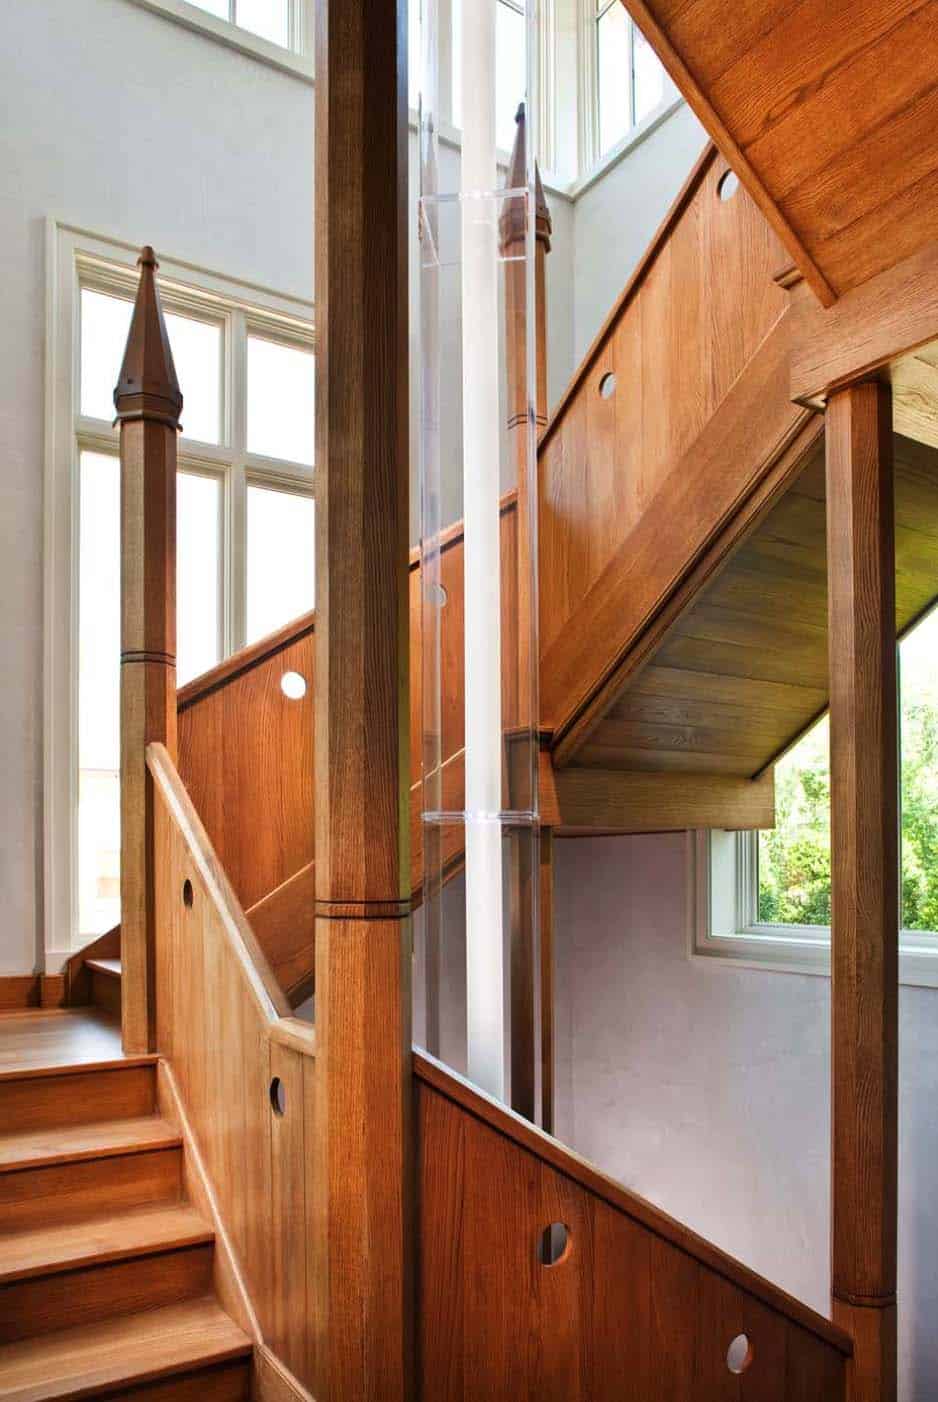
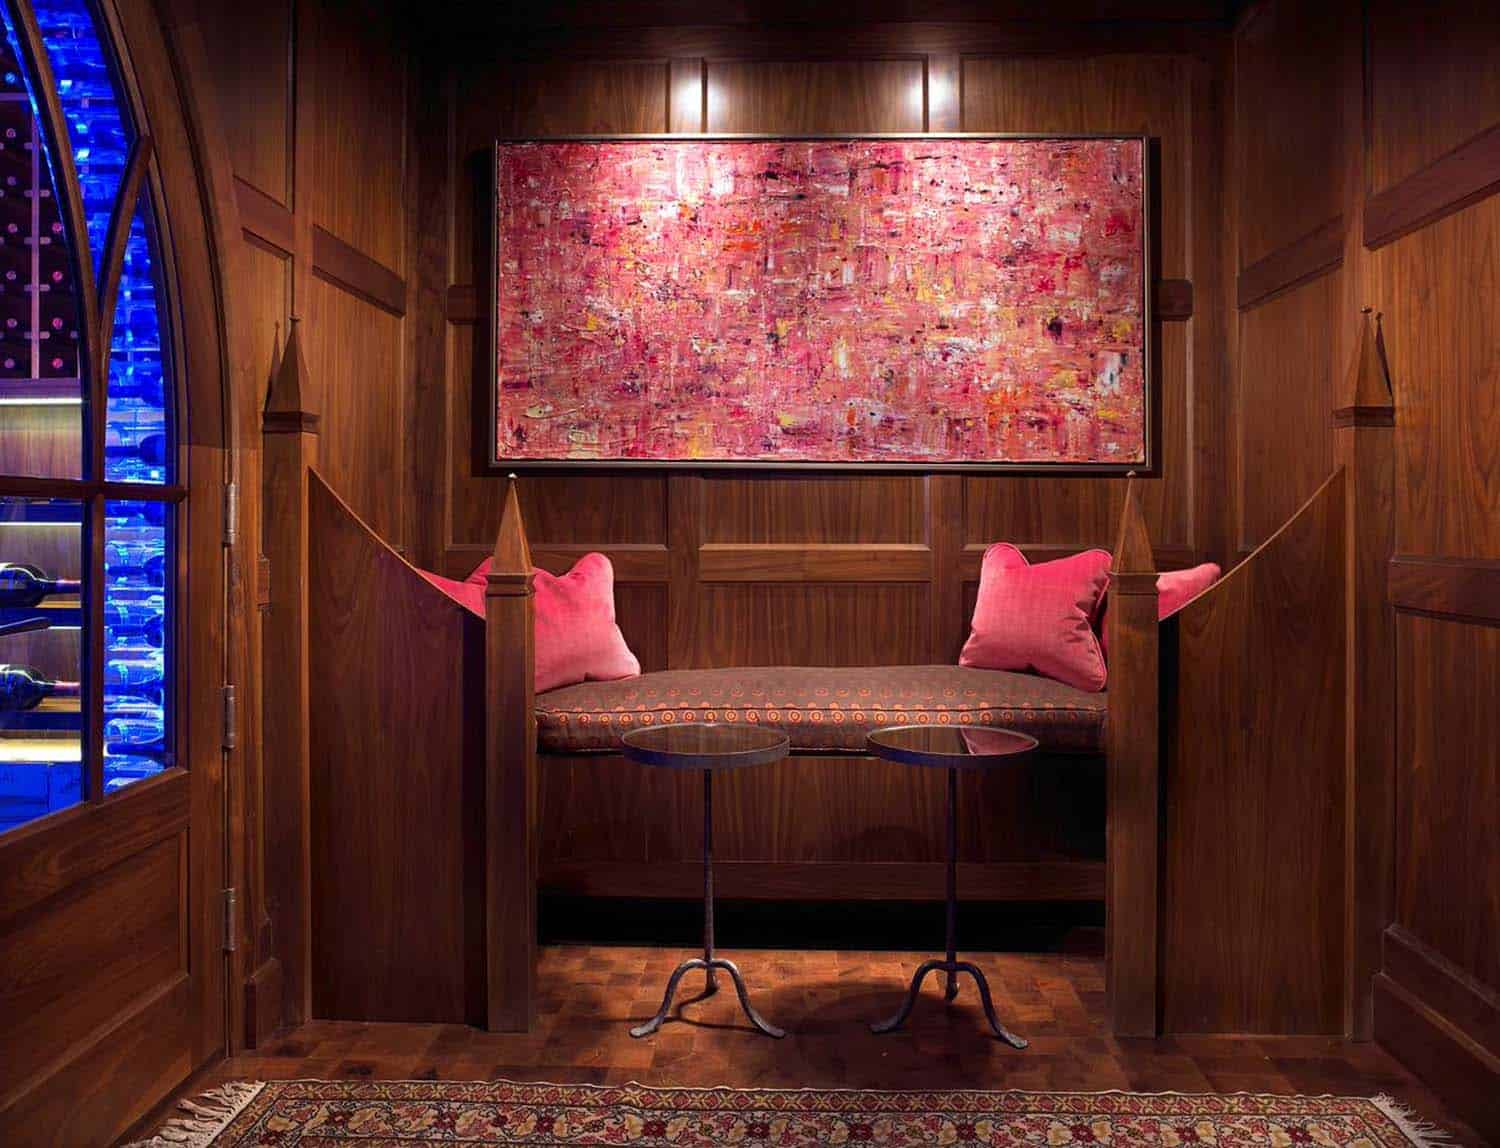
Above: This staircase continues the Gothic style with a solid wood railing that incorporates dramatic spires. The circles under the hand rail and the custom acrylic light adds modern touches to this traditional style.
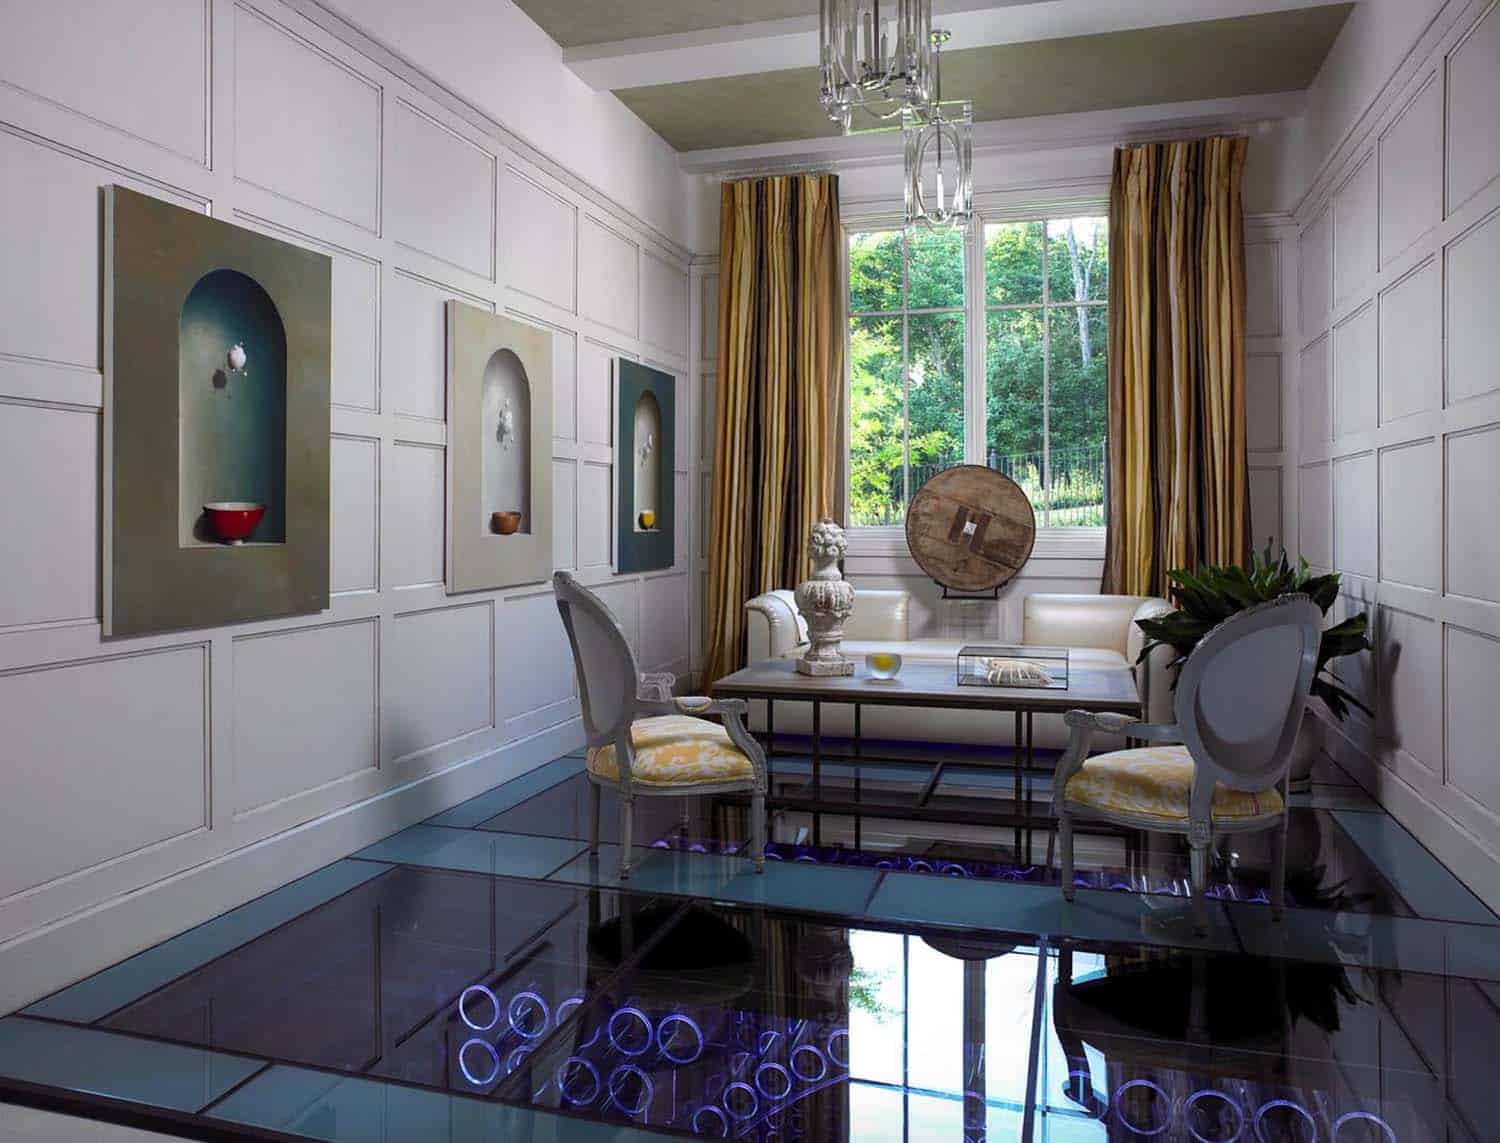

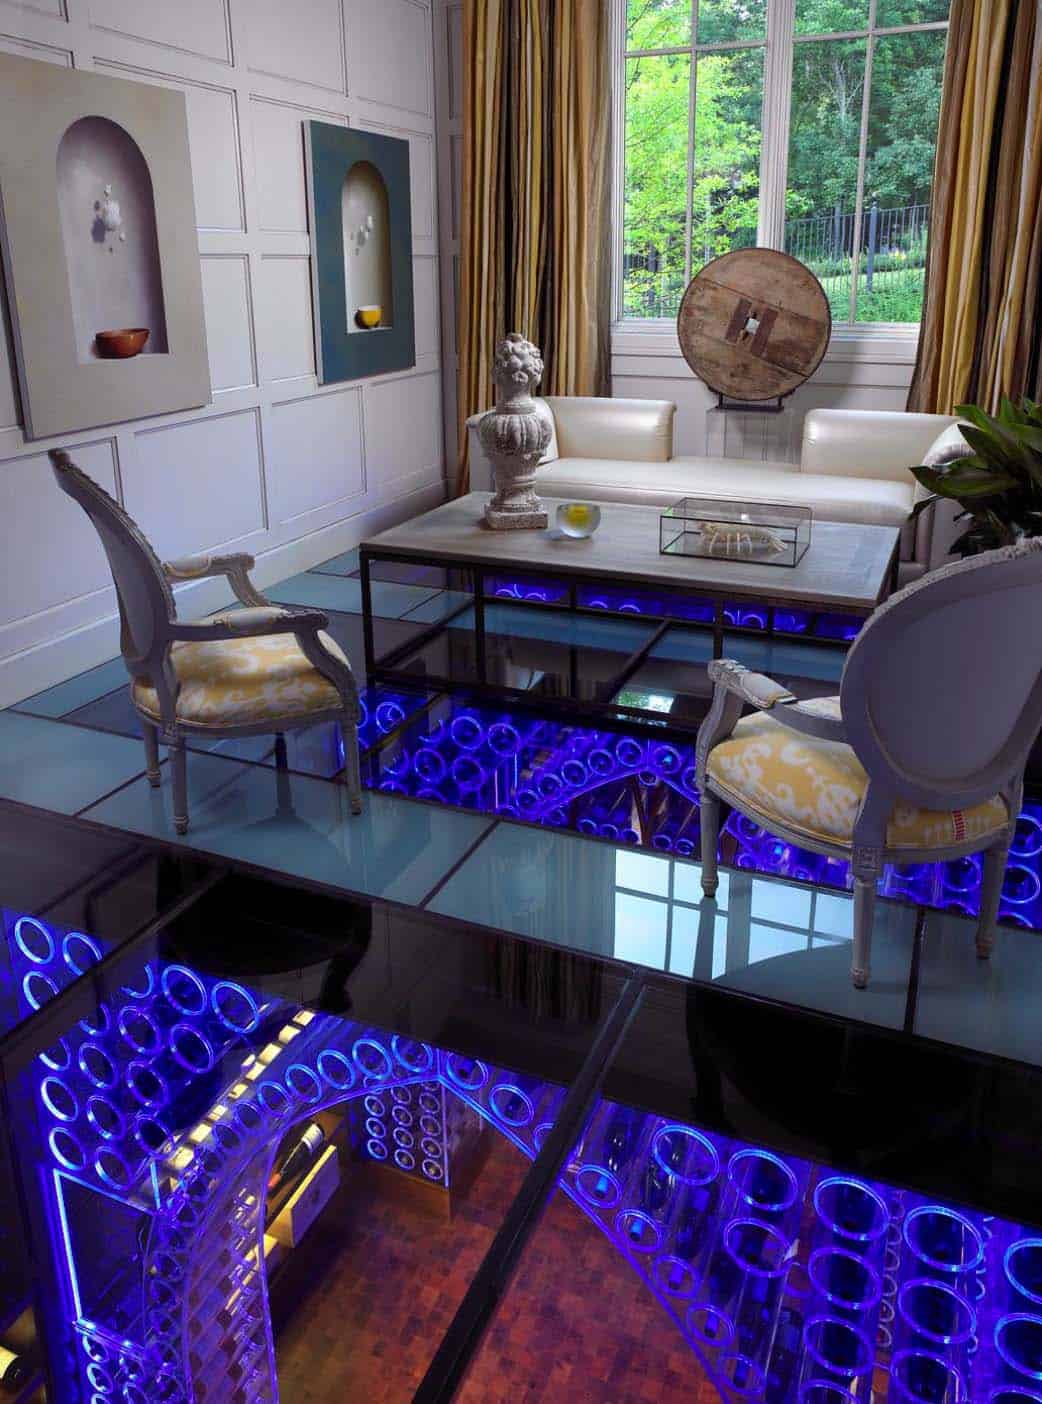
Above: The wine cellar was designed so that it could be viewed from above, so all details had to look good from every viewing angle. The wood had to be finished from above and lighting wiring had to be tucked away. The glass floor has a retractable screen when not entertaining to minimize light exposure on the wine.

Above: A maximum of 2,000 bottles can be stored in these futuristic Gothic arches, composed of acrylic and illuminated by LED lighting. The material used on the floor is called Mosaic, a patterned wood block that is finished after installation.
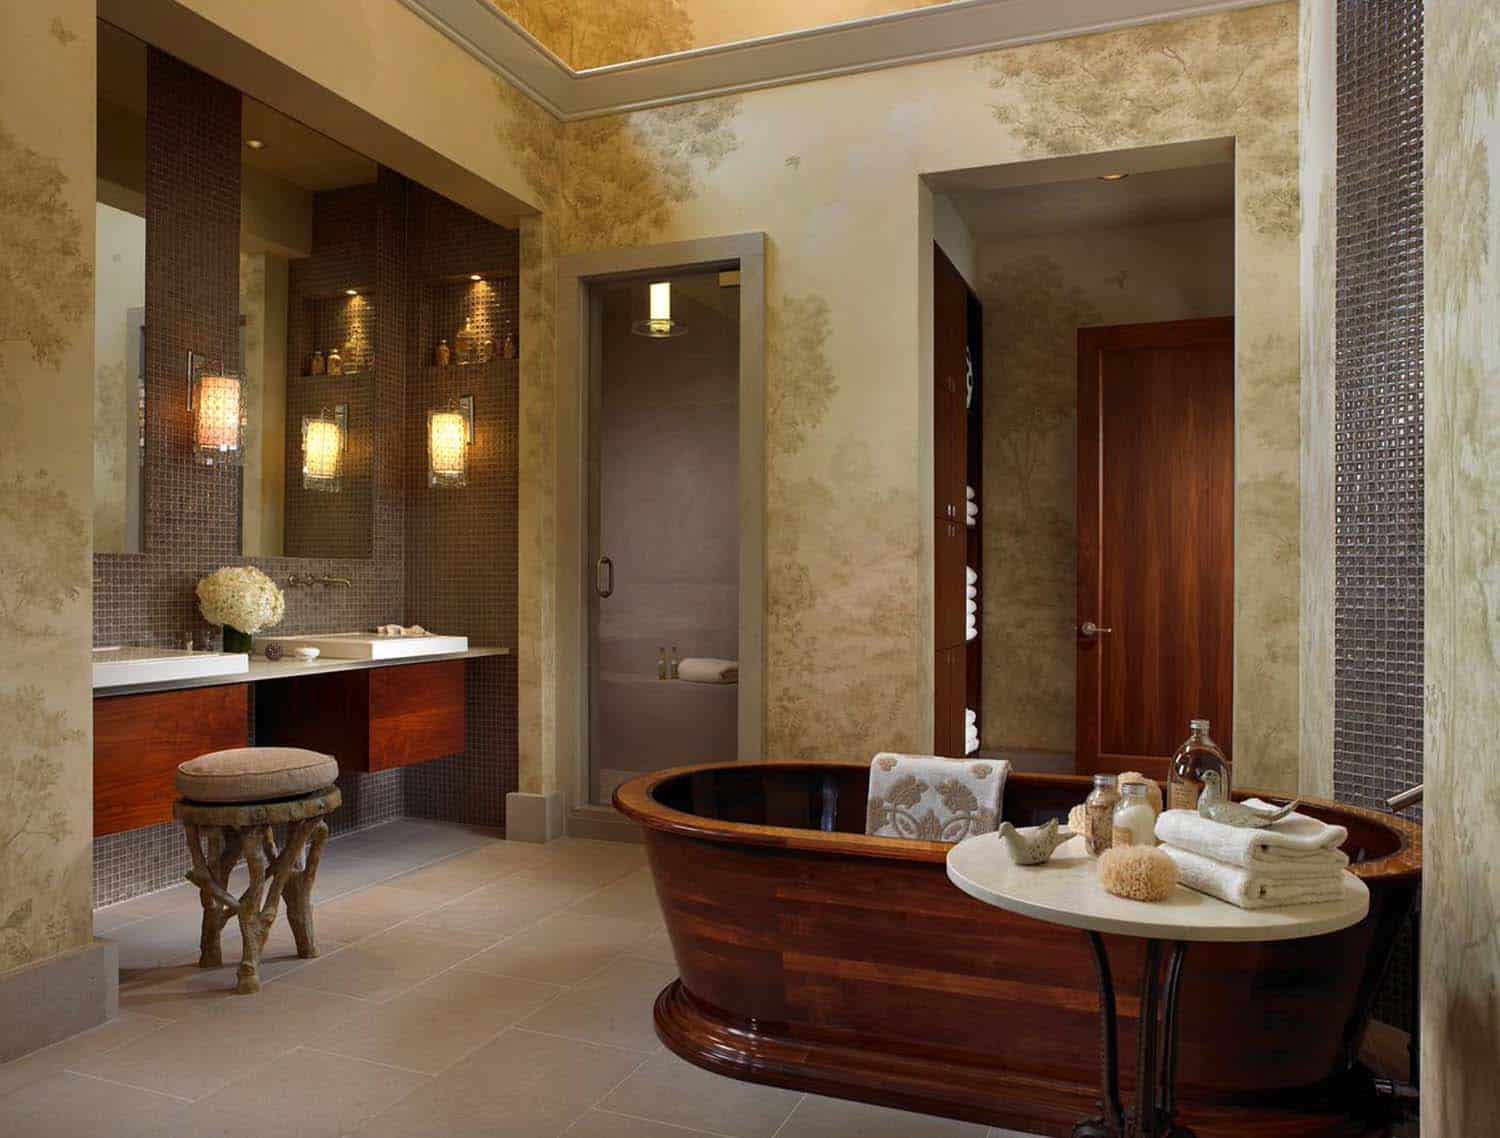
Above: The bathtub is solid walnut with birdseye maple inlay trim, another of Jamie’s creations. The tub is inspired by luxury wooden yachts, made entirely of wood and sanded with several layers of polyurethane for a shiny, smooth finish.


Photos: Kim Sargent


Original article and pictures take https://onekindesign.com/2019/02/06/gothic-inspired-pool-house/ site

There was a time when almost every family had a root cellar of some kind. They all learned how to build a root cellar. However, with the advent of modern refrigeration, DIY root cellars have seemingly lost their value. Refrigerators in the house became a modern convenience, storing all foods between 32 to 40 degrees. But instead of long-term storage of valuable fruits and vegetables, we often find our crispers full of decaying produce that ends up going to the chickens, being composted, or worse yet, ending up in a landfill. It turns out that not all foods are best stored at temperatures as cold as modern refrigeration. Fruits and vegetables such as cucumbers, eggplant, snap beans, peppers, garlic, onions, pumpkins, squash, sweet potatoes, potatoes, tomatoes, tomatillos, and watermelon all prefer a warmer storage temperature closer to 50 degrees, and can actually be damaged by colder temperatures.
Luckily, nature has once again provided the perfect food storage option. With underground temperatures remaining constant at around 52 degrees F, and the presence of high humidity due to soil moisture, a root cellar dug into the ground is the perfect environment for the storage of not only fruits and vegetables, but also aging cheese, fermented vegetables, and jars of canned goods that we have run out of room for in the pantry. For those of us who farm or garden, keeping a root cellar underground or in the basement allows us to properly store the abundance we have been blessed with during the growing season.
The traditional root cellar is dug into the side of a hill, or dug straight down into the ground, well below the freezing point of the soil for a particular region. Ideally the depth of the root cellar allows for standing room. This allows for easy management of goods and creates zones within the root cellar. Cold air sinks and warm air rises, so vegetables such as root vegetables that prefer colder temperatures can be placed closer to the ground.
A dirt root cellar is an option, but leaves your storage space more open to critters who may think that you placed your abundance of produce there just for them. Instead, the root cellar can be lined with bricks, cinder blocks, or poured concrete slabs. Wood can also be used, but will eventually need to be replaced over time. Here at No. 9 Farms, since we live in “tornado alley,” we purchased a prefabricated concrete storm shelter and placed it underground. It works quite well for both purposes.
This is an area where you will have less control over temperature, and is more susceptible to critters who think you are sharing, but for milder regions, this can be an excellent option for short and long-term storage. Storing in crates of some kind is recommended for this option.
What could be more convenient than having your food storage in your house? On those cold winter days, walking out to the root cellar first thing in the morning isn’t always appealing. An underground basement can provide excellent storage conditions. Choose a north or northeast corner of the basement that is not connected to modern heating and cooling. This type of area can be created even in modern homes by closing off an area with walls and a door in a part of the basement where a vent is not present
Check with your local extension office or online guides for specific lists of ideal root cellar temperatures and humidity levels for individual fruits and vegetables. A number of produce items will need to be cured before being placed into long-term food storage.
Onions and garlic should be cured in a warm, dry area in the shade for a week before being trimmed. After trimming, cure alliums for another two weeks. Temperatures in the 80’s and 90’s are preferable.
Potatoes should be cured in cool, dark, moist environment (such as your root cellar if you have room to spread them out) for a couple of weeks before being placed in a container with a lid. A loosely closed container will prevent shriveling.
Sweet potatoes can be tricky to cure because they are often harvested in the fall before freezing temperatures set in. Their ideal curing temperature is 85 degrees with high humidity. In most regions of the country, fall temperatures are well below this level. Here at No. 9 Farms we cure our sweet potatoes in the greenhouse for two weeks before moving them to the root cellar.
Pumpkins and winter squash can be cured at 70-80 degrees for a couple of weeks in a well-ventilated area. If there is concern of freezing nighttime temperatures, be sure to bring your squash indoors to prevent damage.
Cabbages and root vegetables prefer cool, moist conditions. Store cabbages with roots intact along with root vegetables in moist sand near the floor of the root cellar.
The environment of every root cellar will be different, just as the microclimate of every growing space if different. Over time you will get to know your space and the adjustments that need to be made. Listen to your fruits and vegetables—they will let you know if conditions are not ideal. Start small and learn the art of food storage. It will help you break the grocery store paradigm.
Stephanie Oaks lives in Ashland City, Tennessee, where she and her husband own and operate No. 9 Farms, an organic farm that specializes in berries, herbs, fruits and vegetables, and Christmas trees. Stephanie spends the remainder of her time homeschooling their two teenage children and teaching classes on organic gardening and healthy cooking.
Original article and pictures take https://mollygreen.com/blog/keeping-a-root-cellar/ site
Working at home for some people provides different sensation as they can always be with the family. It is the homiest office ever since owners can always redecorate the home office anytime. According to our experience, the farmhouse home office has been people’s favorite style as it has the simple structure and easy to make. For many DIYers, building this concept is a challenge that’s never been boring to talk about.

This friendly style seems to be timeless as it could represent the traditional vibe in modern batch of design. The combination is not difficult to be made thus many people always love this style for every part of the home. There are some rules about farmhouse home office that can be used as guideline in decorating process. Here are some rules that you need to know.
The farmhouse home office has the general concept that is similar with the usual farmhouse concept for other rooms. It should employ minimalist element that exemplify country living with wooden floors and rich of wood furniture. The rustic element is sometimes maintained but some designs reduce its presence to make the room looks more flexible and functional.
The other element that presenting the farmhouse style is the coloring style. White is still dominating the entire room. It provides a perfect canvas for the natural color palette like red, yellow and brown for the wood, green and violet for the indoor plant décor, and black for the metal accessories. For more real example, you can check all farmhouse home office in our gallery below.
Original article and pictures take https://elonahome.com/home-office-in-farmhouse-style/ site

Click to enlarge. Views may vary slightly from working drawings. Refer to floor plan for actual layout.
Plan Details |
| PDF File (Best Value) Electronic file of the construction drawing delivered by email to the customer usually within 24-48 hours of purchasing (during regular business hours.) Includes a copyright release to print the blueprints needed for construction. Copies can be printed on 8 1/2" x 11" sheets right from your computer or take the file to a blueprint shop and print full sized garage plans for construction. Saves time and shipping costs. Note: Some of our designers require customers to sign and return a licensing agreement before the plans are emailed. | $1,050.00 |
Processing and shipping fees are calculated per plan, and not per total order. Rates are subject to change without notice.
| Continental US | Canada | AK/HI | *International |
| *Please Note: International orders may take up to 3 weeks for delivery. |
Original article and pictures take https://www.thegarageplanshop.com/085g-0005.php site

Rabbit hutch plans, plans include free PDF download, step-by-step illustrated instructions, measurements, cutting list, and shopping list.


Cut the legs to the height you want the rabbit hutch or as shown above.
Cut four 2×4’s to 18″ and four 2×2’s to 18″, assemble the leg pieces to form a L, next drill pilot holes and secure them together with 2 1/2″ deck screws. Attach the legs to the corners of the floor by drilling pilot holes and using 2 1/2″ deck screws.
Cut wire mesh to size and install as shown on illustration above.

Build three wall frames as show on illustration above. Cut three 2×2’s to 24″ long, three 2×2’s to 32″ long, three 2×2’s to 21″ long, cut a 10 degree angle cut to one end, and three 2×2’s to 17″ long, cut a 10 degree angle cut to one end.
Assemble the wall frames as shown on illustration above, drill pilot holes and assemble with 2 1/2″ deck screws.

One of the wall frame will have wire mesh, cut to size and install using fence staples.
Install the walls, drill pilot holes and screw 2 1/2″ deck screws through the bottom wall frame and into the floor.

Cut a 2×4 to 29 1/8″ long, make a 10 degree bevel cut to one edge of the board. Cut a 2×2 to 13 1/4″ long, make a bevel cut to one edge of the board. Install as shown on illustration above, drill pilot holes and use 2 1/2″ deck screws.

Cut two 2×2’s to 13 1/4″ long, make a 10 degree bevel cut to the edge of one of the 2×2 boards. Cut a 2×4 to 29 1/8″ long, make a bevel cut to one edge of the board. Drill pilot holes and install with 2 1/2″ deck screws.


Cut two 2×2’s to 29 1/8″ long, and two 2×2’s to 17 1/2″ long. Assemble the door frame as shown on illustration above, drill pilot holes and assemble with 2 1/2″ deck screws. Cut wire mesh to size and attach to the door frame.

Cut two 2×2’s to 19″ long. and two 2×2’s to 13 1/4″ long. Assemble the door frame as shown on illustration above, drill pilot holes and use 2 1/2″ deck screws to assemble. Cut siding to size and attach to the door frame, screw 1 1/2″ deck screws through the siding and into the door frame.


Original article and pictures take https://www.construct101.com/rabbit-hutch-plans/ site